What’s actually slowing this PC down?
Pick the symptom - the matching free tool is one click away.
A good backyard fire pit is not just a ring of blocks with chairs around it. It is a small construction project with heat, drainage, smoke, traffic flow, local fire rules, and sometimes gas or electrical work involved. The best DIY fire pit idea for your home depends on four things: budget, fuel type, available clearance, and how permanent you want the space to be.
For most homeowners, the sweet spot is a 36- to 44-inch fire pit set inside a gravel, paver, or patio seating area. That size is large enough for a real flame but still small enough for conversation. Many local recreational-fire rules cap the burn area around 3 feet in diameter and 2 feet high, so check your local fire department, HOA, insurance policy, and any temporary burn bans before buying materials.
On our job sites, we design the seating circle first. A common working layout is to keep furniture legs roughly 6 to 7 feet from the fire pit, then add walking room behind the chairs. If your yard cannot support that safely, choose a portable propane bowl, chiminea, or tabletop unit instead of forcing a full masonry pit into a tight space.
Fire Pit Budget and Type Comparison
Use this table to narrow the field before you fall in love with a design. Costs reflect 2026 US ranges and assume typical homeowner-grade materials. Labor, delivery access, slope correction, permits, gas lines, and patio work can change the number fast.
#1 Best Overall

- [Low Smoke Design]: OutVue smokeless fire pit has unique design and scientific internal airflow system, provides you with a clean flame atmosphere. No more sting the eyes smoke, no more suffocating air - just the enough warmth and ambiance of low smoke fire pit. We send a waterproof cover and a poker to you for using the low smoke fire pit more convenient.Note:Store assembled fire pit in a cool, dry location away from children and pets.Keep the fire pit covered when cooled and not in use.
- [Multiple Applicable Scenarios]: This wood burning fire pit can be assembled in seconds without any tools required, making it easy to transport and store. This smokeless fire pit is easy to carry, you can light a fire wherever you go - whether you go camping, have a party ,go to beach, or backyard.
- [High-quality Material]: Outvue smokeless fire pits are made of stainless steel, with stable heat resistance at high temperatures, good corrosion resistance, and long service life. This low smoke fire pit is ideal for 7-10 person camping, bonfires, and patio gatherings. Dancing flames create a bright and comfortable atmosphere and extend your outdoor recreation time.
- [Powerful warmth &Easy to Clean]: This sturdy low smoke fire pit delivers efficient heating to your space. Just add the desired amount of wood or burn pellets for an ultra-hot flame.to generate ample warmth. Outvue firepit for outside advanced design ensures a fast and efficient burn. When cleaning, just lift the fire pit, take out the ash tray, and clean its contents.
- [Note]: We can provide replacement parts for the product. If you have any questions, please contact us. Please maintains a safe distance when using the smokeless fire pit, especially children and pets. [Keep over 0.5 meters]. Do not use this on grass or wooden floors, keep away from flammable things and furniture.
| Fire pit type | Typical DIY or installed cost | Best fuel | Best fit | Code watch-out |
|---|---|---|---|---|
| Portable steel bowl | $75-$500 | Wood or propane | Renters, small budgets, flexible layouts | Still needs clearance from structures, decks, fences, trees, and combustibles |
| Gravel and block ring | $300-$1,500 | Wood | Classic backyard seating area | Use fire-rated liner or insert; confirm recreational-fire size limits |
| Patio-integrated pit | $2,000-$6,100+ | Wood, propane, or gas | Permanent outdoor living spaces | Patio base, drainage, setbacks, and permits may apply |
| Gas fire feature | $400-$3,000+ before hardscape | Natural gas or propane | Low-smoke entertaining | Fixed gas lines need licensed installation, shutoffs, ventilation, and inspection |
| Custom stone or masonry pit | $3,000-$5,000+ | Wood or gas | High-end hardscape designs | Thermal movement, drainage, footings, stone selection, and local approvals matter |
Before You Build: Size, Clearance, Materials, and Permits
Clearance rules vary widely. We see common minimums from 10 to 25 feet from houses, fences, decks, trees, sheds, vegetation, and other combustibles. Some fire districts require 30 feet. Do not assume the 10-foot rule applies where you live. In wildfire-prone areas, no-burn days and seasonal restrictions can override a normally legal setup.
For wood-burning pits, use fire brick, a steel insert, or a listed fire ring inside the pit. Decorative concrete block, landscape stone, river rock, and some natural stones can crack or spall when exposed to repeated flame and trapped moisture. Avoid wet stone and never use unknown stone from a creek bed inside the burn area.
Build the base like it matters, because it does. Excavate soft organic soil, compact the subgrade, add several inches of compacted paver base or crushed stone, and create drainage so water does not sit inside the pit. Standing water shortens the life of the ring and can make freeze-thaw damage worse in cold climates.
If you are installing natural gas, buried propane, electric ignition, a permanent patio, a deck feature, or a fire pit near retaining walls, call before you dig and check permits first. Building permits alone can run about $20-$500, and gas-line work may add $15-$25 per linear foot plus licensed labor. Fixed gas connections are not a homeowner guesswork project.
Free tools Windows power users keep installed
One-click scans. No signup required.
26 DIY Fire Pit Ideas by Style and Budget
1. Portable Steel Bowl
Best for: quick setup, renters, and low-commitment backyards. Approximate DIY cost: $75-$500. Skill level: beginner. Fuel: wood or propane, depending on model. Style fit: casual, transitional, cabin, and starter patios.
This is the simplest way to add a fire feature without building one. Place it on a noncombustible surface such as gravel, pavers, or concrete, keep it level, and use a spark screen for wood-burning models. Do not place a wood-burning bowl directly on a deck unless the manufacturer specifically allows it with the required heat protection and your local code permits it.
2. smokeless insert Pit
Best for: homeowners who want less smoke without a permanent build. Approximate DIY cost: $250-$900. Skill level: beginner to moderate. Fuel: wood pellets or split wood, depending on unit. Style fit: modern, compact, and urban yards.
A smokeless insert can sit inside a paver or gravel area and gives you a cleaner burn than a basic open ring. Leave the manufacturer-required air gaps. Do not bury or block intake vents, because the airflow is what makes the system work.
Recommended Free Tools
3. Gravel-and-Block Fire Ring
Best for: affordable weekend builds. Approximate DIY cost: $300-$1,500 with new materials. Skill level: moderate. Fuel: wood. Style fit: traditional backyard, farmhouse, and family spaces.
This is the classic DIY fire pit: compacted base, metal liner, retaining-wall blocks, and a gravel seating area. A documented small stone build can come in around $230 when materials are minimal, but a finished area with new block, gravel, edging, delivery, and chairs is usually closer to several hundred dollars or more.
4. Retaining-Wall Block Pit
Best for: circular above-ground pits. Approximate DIY cost: $400-$1,200. Skill level: moderate. Fuel: wood. Style fit: suburban, craftsman, and rustic patios.
Use trapezoid retaining-wall blocks sized for a tight circle, then line the inside with a steel fire ring. Keep adhesive away from areas exposed to direct flame unless it is rated for high heat. Most homeowners can build this in a weekend after site prep.
5. Concrete Paver Square Pit
Best for: modern geometry and easy layout. Approximate DIY cost: $500-$1,500. Skill level: moderate. Fuel: wood or propane kit. Style fit: modern farmhouse, contemporary, and clean-lined patios.
A square pit is easier to align with patios, walkways, and built-in seating. It also makes mistakes more visible. Keep courses level, use a fire-rated liner, and avoid narrow interior corners that trap ash and water.
6. Fire-Brick-Lined Stone Pit
Best for: a more durable wood-burning build. Approximate DIY cost: $700-$2,000. Skill level: intermediate. Fuel: wood. Style fit: rustic, mountain, cottage, and natural landscapes.
The fire brick handles heat while the outer stone provides the look. This is the right approach when you want stone but do not want decorative material taking direct flame. Budget extra time for layout and cutting.
7. Steel Insert With Paver Surround
Best for: predictable performance and easier maintenance. Approximate DIY cost: $600-$1,800. Skill level: moderate. Fuel: wood. Style fit: neat, finished, and low-maintenance yards.
A steel insert protects the outer surround and gives you a clean burn chamber. We like this approach because the pit can be repaired in layers: replace the insert later without rebuilding the whole seating area.
8. Pea-Gravel Lounge Area
Best for: budget-friendly outdoor rooms. Approximate DIY cost: $500-$2,000 including edging and base. Skill level: beginner to moderate. Fuel: wood or propane. Style fit: relaxed, coastal, cottage, and informal backyards.
Rank #2

- SMOKELESS PERFORMANCE: Designed to help reduce smoke and ash, this fire pit delivers cleaner-burning flames and a more comfortable experience for backyard gatherings, patio nights, and outdoor entertaining.
- 25-INCH GATHERING SIZE: The spacious round fire pit creates a warm centerpiece for patios, decks, backyards, campsites, and cabins, with a 4-foot heat radius for comfortable outdoor evenings.
- DURABLE CONSTRUCTION: Built from 16-gauge stainless steel with a black powder-coated finish for dependable outdoor use and modern style throughout the fall and holiday entertaining season.
- EASY CLEANUP AND PROTECTION: After the fire is completely cool, the removable ash pan simplifies cleanup. A sturdy stand and weather-resistant cover are included for convenient setup and protection between uses.
- FLEXIBLE FUEL OPTIONS: Burn natural cut firewood or TIKI Wood Packs for a classic or convenient fire experience. Compatible accessories include a Screen and Poker, Heat Deflector, Tabletop, and Griddle; sold separately.
Pea gravel is comfortable underfoot but should sit over compacted base and landscape fabric. Use firm edging so the circle keeps its shape. For chairs, test leg stability before committing; thin furniture legs can sink or wobble.
Outdated Drivers Are Slowing You Down
One free scan finds every outdated or missing driver and matches the right update for your exact hardware.Free scan · exact hardware matchWindows Errors? Fix Them Before They Spread
Repair common Windows errors and clear accumulated junk for a smoother, more stable PC - no reinstall needed.Free scan · no reinstall9. Decomposed-Granite Fire Circle
Best for: a firmer walking surface than pea gravel. Approximate DIY cost: $700-$2,500. Skill level: moderate. Fuel: wood or propane. Style fit: Southwest, modern rustic, and drought-tolerant landscapes.
Decomposed granite compacts into a cleaner surface and pairs well with steel or stone edging. Use stabilized material where foot traffic is heavy. Plan drainage carefully so the surface does not rut after storms.
10. Patio-Integrated Kit
Best for: homeowners already installing or extending a patio. Approximate DIY cost: $2,000-$6,100+ with surrounding patio scope. Skill level: intermediate to advanced. Fuel: wood, propane, or gas. Style fit: finished outdoor living rooms.
fire pit kits are convenient, but the patio base is the real project. If the patio settles, the pit will look wrong even if the ring is perfect. For larger patios, poor access, or drainage corrections, hiring a hardscape crew is often the better value.
Quick wins for a faster PC:
Repair Windows errors before they cause bigger problemsFix Now →Scan for outdated or missing drivers - takes under a minuteDriver Scan →Clear out junk files and repair common Windows errorsFree Scan →11. Tabletop Propane Bowl
Best for: small patios and no-wood communities. Approximate DIY cost: $80-$400. Skill level: beginner. Fuel: propane. Style fit: balconies where allowed, townhomes, and compact seating areas.
This is more ambiance than heat source. Use it only on surfaces approved by the manufacturer, keep the propane hose protected, and follow local rules for multifamily buildings and balconies.
12. Modern Concrete Bowl
Best for: sculptural style without a full masonry build. Approximate DIY cost: $300-$1,200. Skill level: beginner if purchased, advanced if cast. Fuel: propane or gel, depending on model. Style fit: modern, minimalist, and poolside areas.
Factory-made concrete bowls are more reliable than improvised concrete containers. If you cast your own, use refractory materials and follow burner specifications. Ordinary concrete can crack under heat.
Do these 3 things before closing this tab:
1Repair Windows errors before they cause bigger problems2Fix the driver behind crashes, sound loss and screen glitches3Clear out junk files and repair common Windows errors13. Corten Steel Ring
Best for: modern rustic yards and low-profile flames. Approximate DIY cost: $250-$1,000. Skill level: beginner to moderate. Fuel: wood. Style fit: contemporary, desert, industrial, and native-plant landscapes.
Corten develops a weathered finish that looks intentional, but it can stain nearby surfaces during the early weathering period. Keep it off light concrete or protect the area until the patina stabilizes.
14. Brick Fire Pit
Best for: traditional homes and classic gardens. Approximate DIY cost: $500-$2,200 installed range for brick; DIY varies by brick choice. Skill level: intermediate. Fuel: wood. Style fit: colonial, craftsman, cottage, and formal patios.
Use fire brick inside the burn chamber, not standard salvaged brick exposed directly to flame. Older brick may look perfect and still fail under heat. Mortar joints need to be neat because brick makes every line visible.
15. Natural Stone Fire Pit
Best for: high-character landscapes. Approximate DIY cost: $700-$3,000; custom masonry often $3,000-$5,000+. Skill level: intermediate to advanced. Fuel: wood or gas with listed components. Style fit: rustic, lodge, traditional, and estate landscapes.
Choose dense, heat-appropriate stone and use a liner. Natural stone varies in thickness, so expect more fitting and cutting. Delivery access matters because even a modest stone pit can involve several thousand pounds of material.
16. Sunken or In-Ground Pit
Best for: sheltered seating areas with a campfire feel. Approximate DIY cost: $1,000-$3,000 installed range. Skill level: advanced. Fuel: wood. Style fit: modern, resort, and large flat yards.
In-ground pits need drainage more than most people expect. A pit that collects water becomes a maintenance problem. Confirm local rules too, because some jurisdictions restrict open flame below grade or require specific dimensions.
Rank #3

- [4 IN 1]: OutVue smokeless fire pit is equipped with 2 cooking grills, 1 tabletop[No waterproof cover,NO Lid]. When you fix grills and tabletop to the fire pit, you can enjoy the roast and bonfire. When it not make fire, you will get a 42 inch round tabletop to have a meal or coffee .OutVue provide a fire pit has 4 functions:low smoke,bonfire, barbecue and table, which can be used all year for your garden. This's also a very thoughtful gift to friends.
- [Beautiful Design]OutVue smokeless fire pit table comes with 2 height-adjustable and 360° swivel grills which disassemble freely. You can barbecue, keep food warm or put pan to cook on them. The side of wood-burning fire pit is created with modern geometric cut-out design which catches firelight for creating fun shadows. The drilled design promotes airflow and keeps the fire strong. All sophisticated designs of the fire pits for outside are dedicated to the warmth and comfort for you.
- [Durable& Safe] OutVue outdoor smokeless fire pit hold up to 30 lb wood, offer roaring fire and enough warmth. Smokeless firepit table has 4 legs and enough weight can improve stability on uneven ground. Wood fire pits for outside coated with high-temperature powder for durability and rust resistance. The screen meshes on the vents avoid sparks and embers from flying out. Fire poker lets you to move wood safely.
- [Easy Assembly] The wood burning fire pit comes with detailed instruction, so it can be set up in 20 minutes. NOTE: It should be noted that the screws should not be tightened completely during installation until all pieces are connected together. After easy installation, get wonderful time with family around OutVue smokeless fire pit table!
- [What Will You Get]The package contains 1 low smoke inner liner,1 fire pit tabletop, 1 fire poker, 2 cooking grates and all parts required for assembly. We provide friendly customer service, if you have any questions, please contact us freely. We wish you can get happiness and cozy memories with your families or friends around Outvue fire pits for outside.We can provide replacement parts for the product. If you have any questions, please contact us
17. Half-Wall Windbreak Pit
Best for: breezy yards and privacy. Approximate DIY cost: $1,500-$5,000+. Skill level: advanced. Fuel: wood or gas. Style fit: contemporary patios and outdoor rooms.
A low masonry wall can make a fire area more comfortable, but walls change airflow and smoke behavior. They may also trigger structural or zoning rules depending on height and location. Keep seating clearances generous.
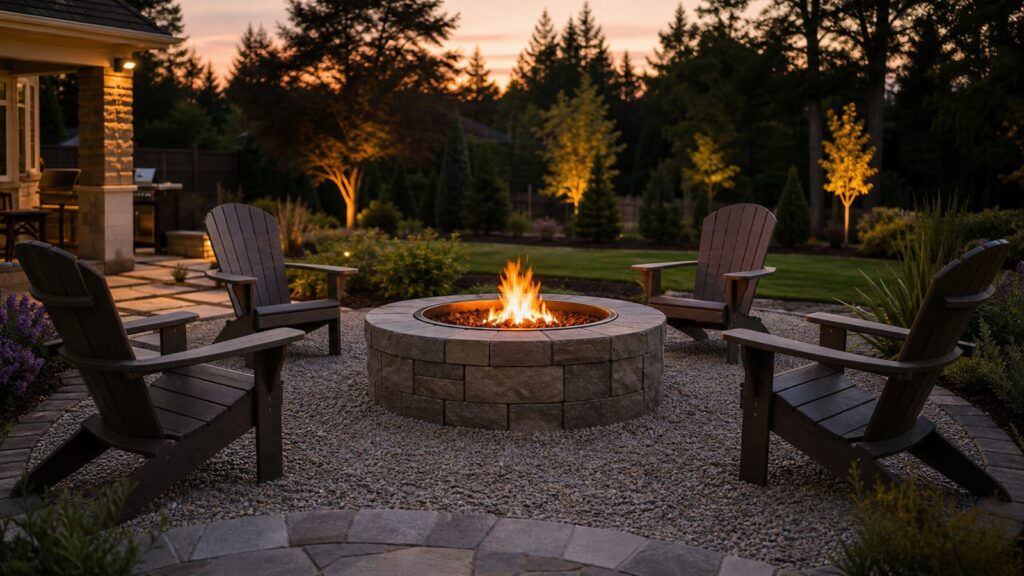
18. Adirondack Seating Ring
Best for: simple, comfortable gathering areas. Approximate DIY cost: $700-$3,500 including seating. Skill level: beginner to moderate. Fuel: wood or propane. Style fit: lake house, farmhouse, and casual family yards.
Six Adirondack chairs around a 36- to 44-inch pit need more space than many homeowners expect. Lay out the chairs with painter’s tape, stakes, or a garden hose before digging. Account for people walking behind seated guests.
The Tool Desk
Outbyte Driver Updater FREEFix the driver behind crashes, sound loss and screen glitchesFind Drivers →Outbyte PC Repair FREEClear out junk files and repair common Windows errorsFree Scan →19. Built-In Bench Surround
Best for: permanent entertaining spaces. Approximate DIY cost: $2,500-$8,000+ depending on materials. Skill level: advanced. Fuel: propane or gas often works best. Style fit: modern patios, courtyards, and outdoor rooms.
Built-in seating looks clean, but it removes flexibility. We plan bench depth, back height, heat exposure, and exit paths before setting the first block. Cushions and wood framing need proper distance from flame.
20. Cooking-Grate Campfire Pit
Best for: families who want occasional open-fire cooking. Approximate DIY cost: $400-$1,500. Skill level: moderate. Fuel: wood or charcoal. Style fit: rustic, cabin, and family recreation areas.
Add a removable grate rather than making the pit only about cooking. Food grease changes cleanup and attracts pests. Keep ash tools, a metal ash can, and a hose or extinguisher nearby.
The Tool Desk
Outbyte Driver Updater FREEScan for outdated or missing drivers - takes under a minuteDriver Scan →Outbyte PC Repair FREERepair Windows errors before they cause bigger problemsFix Now →21. fire glass Propane Table
Best for: low-smoke patios. Approximate DIY cost: $400-$2,000. Skill level: beginner if purchased, advanced if built-in. Fuel: propane. Style fit: contemporary, transitional, and compact entertaining areas.
Fire glass usually costs $20-$200 per 10-pound bag, and larger burners may need multiple bags. Do not overfill above the burner manufacturer’s guidance. Propane compartments need ventilation and access.
22. Linear Gas Fire Trough
Best for: modern patios and narrow seating zones. Approximate DIY cost: $1,500-$6,000+ with enclosure and gas work. Skill level: professional recommended. Fuel: natural gas or propane. Style fit: modern, luxury, poolside, and outdoor kitchens.
This is where DIY usually stops. Fixed gas features need listed burners, proper enclosure ventilation, accessible shutoff valves, clearances, pressure testing, and inspection. Some gas enclosures call for opposing vents totaling at least 36 square inches, but the manufacturer and local code control the final requirement.
Free tools Windows power users keep installed
One-click scans. No signup required.
23. Chiminea Alternative
Best for: small yards where a full fire pit is too exposed. Approximate DIY cost: $150-$700. Skill level: beginner. Fuel: wood or propane, depending on model. Style fit: cottage, Spanish, courtyard, and compact patios.
A chiminea directs smoke upward better than many open bowls, but it still needs clearance and a stable noncombustible base. Clay models can crack if overheated or left exposed to freeze-thaw cycles while wet.
24. Deck-Safe Propane Table Where Allowed
Best for: decks with strict manufacturer-approved equipment. Approximate DIY cost: $300-$2,500. Skill level: beginner for portable units. Fuel: propane. Style fit: townhomes, raised decks, and outdoor dining areas.
Do not assume any fire feature is deck-safe. Use only a listed product approved for that surface, follow required clearances, and confirm local code and HOA rules. Wood-burning pits on decks are usually a bad idea unless a very specific approved system is used.
Recommended Free Tools
25. Poolside Gas Feature
Best for: resort-style outdoor spaces. Approximate DIY cost: $2,000-$8,000+ depending on gas, hardscape, and finishes. Skill level: professional recommended. Fuel: natural gas or propane. Style fit: modern, luxury, and entertainment-focused yards.
Rank #4

- [Low Smoke Design]: Grovellis smokeless fire pit has unique design and scientific internal airflow system, provides you with a clean flame atmosphere. No more sting the eyes smoke, no more suffocating air - just the enough warmth and ambiance of low smoke fire pit. We send a waterproof cover and a poker to you for using the low smoke fire pit more convenient.Note:Store assembled fire pit in a cool, dry location away from children and pets.Keep the fire pit covered when cooled and not in use.
- [Portable Design]: This wood burning fire pit can be assembled in seconds without any tools required, making it easy to transport and store. This smokeless fire pit is easy to carry, you can light a fire wherever you go - whether you go camping, have a party ,go to beach, or backyard.
- [High-quality Material]: Grovellis smokeless fire pits are made of stainless steel, with stable heat resistance at high temperatures, good corrosion resistance, and long service life. This low smoke fire pit is ideal for 7-11 persons camping, bonfires, and patio gatherings. Dancing flames create a bright and comfortable atmosphere and extend your outdoor recreation time.
- [Powerful warmth &Easy to Clean]: This sturdy low smoke fire pit delivers efficient heating to your space. Just add the desired amount of wood or burn pellets for an ultra-hot flame.to generate ample warmth. Grovellis firepit for outside advanced design ensures a fast and efficient burn. When cleaning, just lift the fire pit, take out the ash tray, and clean its contents.
- [Note]:We can provide replacement parts for the product. If you have any questions, please contact us. Please maintains a safe distance when using the smokeless fire pit, especially children and pets. [Keep over 0.5 meters]. Do not use this on grass or wooden floors, keep away from flammable things and furniture.
Poolside fire has more coordination than a basic patio pit: gas routing, splash exposure, corrosion-resistant materials, walking clearances, and drainage all matter. We also look at how guests move from the pool to seating so wet traffic does not cross too close to flame.
26. Outdoor-Room Fire Pit With Hardscape Seating
Best for: a complete backyard upgrade. Approximate DIY cost: $5,000-$15,000+ depending on patio, walls, lighting, drainage, and seating. Skill level: advanced or professional. Fuel: propane or natural gas for cleaner daily use. Style fit: high-use family yards and finished outdoor living spaces.
This is the fire pit as part of a full construction plan. It may include retaining walls, seat walls, steps, lighting, drainage, and a patio base. At this point, the pit itself may be a small portion of the budget. The value is in getting layout, grading, and long-term performance right.
What Most Fire Pit Inspiration Lists Miss
The photo-friendly part of a fire pit is the ring. The performance comes from everything around it. Before you build, confirm the following:
- Local rules: Check the authority having jurisdiction, fire department, HOA, insurance requirements, and burn bans.
- Clearance: Verify required distance from the house, fence, deck, trees, sheds, vegetation, and overhead lines.
- Fuel area: Some communities limit recreational fires to about 3 feet in diameter and 2 feet high.
- Base: Use compacted base material, not loose soil or mulch.
- Drainage: Keep water from collecting inside or around the pit.
- Materials: Use fire brick, steel liners, listed inserts, and heat-rated components.
- Smoke: Watch prevailing wind so smoke does not blow into doors, windows, neighbors’ yards, or covered areas.
- Safety gear: Keep a hose, extinguisher, spark screen, ash can, and metal tools nearby.
- Utilities: Call 811 before digging, even for shallow hardscape work.
- Access: Plan how gravel, block, stone, and equipment will reach the backyard without damaging the property.
When to DIY and When to Hire a Pro
DIY makes sense for portable fire pits, tabletop propane bowls, chimineas, simple gravel pads, and basic above-ground block rings when the site is flat, clearances are generous, and local rules are straightforward. A careful homeowner can usually complete a basic gravel-and-block fire pit in one or two weekends with common tools: shovel, tamper, level, rubber mallet, wheelbarrow, masonry adhesive where allowed, and a saw or chisel if cuts are needed.
Hire a pro when the project involves natural gas, buried propane, electrical ignition, tight clearances, retaining walls, slopes, major drainage corrections, concrete work, custom masonry, poolside placement, deck installation, or a permanent patio. Natural gas is a major dividing line. Gas-line installation often runs $15-$25 per linear foot before other costs, and licensed trades may charge $45-$200 per hour. The work can require permits, pressure testing, shutoff valves, enclosure ventilation, and inspection.
Also hire help when the fire pit is part of a larger outdoor room. Patio-integrated fire pit projects can reach about $5,000 before the larger patio scope, and patio bases or surrounds commonly add $2,000-$6,100. A poor base, bad slope, or trapped water can make a nice-looking project fail early.
Best Fire Pit Materials for DIY Builds
For the inside of the pit, use a steel fire ring, stainless insert, fire brick, or a listed burner pan if you are working with gas. For the outside, concrete block, pavers, brick, and natural stone can all work when protected from direct flame. For a 36-inch installed pit, 2026 material-based ranges are roughly $200-$1,000 for concrete, $250-$1,200 for stainless steel, $300-$2,200 for brick, and $350-$3,000 for stone.
For the seating surface, gravel is the budget winner, decomposed granite gives a firmer finish, pavers create the cleanest everyday surface, and poured concrete works well when professionally formed and sloped. Avoid mulch inside the fire zone. It looks tidy on day one but does not belong near open flame.
Useful add-ons have real costs. A safety screen typically runs $75-$300, a cooking grate $50-$300, a basic cover $25-$30, lava rock $20-$50 per bag, fire glass $20-$200 per 10-pound bag, and seating can range from $150 for basic chairs to $3,500 or more for a finished set.
Practical Layout Rules We Use on Job Sites
Start with the flame, then chairs, then walking space. A 36- to 44-inch pit works for most homes. Place chair legs about 6 to 7 feet from the pit, then leave room behind the chairs so people are not stepping between seated guests and the fire. That often means a finished fire area of 14 to 18 feet across, depending on chair size.
What’s actually slowing this PC down?
Pick the symptom - the matching free tool is one click away.
Keep the pit level, but do not make the surrounding area trap water. Slight surface pitch, compacted base, and clean edges help the space last. If the backyard slopes toward the house, solve drainage before adding fire. If smoke usually blows toward the main patio door, move the pit or switch to propane or gas.
The most successful projects are not always the most expensive. They are the ones where the fuel choice, clearances, seating, base, and maintenance all match the way the homeowner will actually use the yard.
Frequently Asked Questions
How much does a DIY fire pit cost in 2026?
A basic portable fire pit can cost $75-$500. A realistic new-material DIY gravel-and-block fire pit usually runs $300-$1,500. Patio-integrated or custom stone projects can reach $2,000-$6,100+ once base, seating, drainage, and hardscape work are included.
Do I need a permit to build a backyard fire pit?
Sometimes. Portable units may not require a building permit, but local fire rules still apply. Gas lines, electrical ignition, permanent patios, deck installations, structural walls, and wildfire-prone locations may require permits or inspections. Building permits commonly range from about $20-$500.
Do these 3 things before closing this tab:
1Repair Windows errors before they cause bigger problems2Scan for outdated or missing drivers - takes under a minute3Clear out junk files and repair common Windows errorsHow far should a fire pit be from a house, fence, deck, or trees?
Clearances vary by jurisdiction. Many rules fall between 10 and 25 feet from structures, trees, fences, decks, vegetation, and combustibles, while some fire districts require 30 feet. Always verify your local fire department, HOA, and insurance requirements before building.
What materials are safe inside a DIY fire pit?
Use fire brick, a steel fire ring, stainless insert, or listed fire pit components inside the burn area. Decorative block, standard brick, river rock, and unknown natural stone should not be exposed directly to flame because heat and trapped moisture can cause cracking or spalling.
Is wood, propane, or natural gas best for a backyard fire pit?
Wood is usually cheapest and gives the classic campfire feel, but it creates smoke and ash. Propane is cleaner and simpler for small spaces. Natural gas is convenient for permanent patios, but it generally requires licensed installation, permits, shutoff valves, pressure testing, and inspection.
When should I hire a pro instead of building a fire pit myself?
Hire a pro for fixed gas lines, buried propane, electrical ignition, deck installations, tight clearances, major patios, retaining walls, drainage corrections, poolside features, and custom masonry. DIY is best reserved for portable units, simple propane bowls, gravel pads, and basic block rings.
Crashes, No Sound, or Screen Glitches?
Random freezes, missing sound and display glitches usually trace back to one bad driver. Find and replace yours safely.Free scan · under a minuteWindows Errors? Fix Them Before They Spread
Repair common Windows errors and clear accumulated junk for a smoother, more stable PC - no reinstall needed.Free scan · no reinstallQuick Recap
Product prices and availability are accurate as of the date/time indicated and are subject to change. Any price and availability information displayed on Amazon at the time of purchase will apply.