What’s actually slowing this PC down?
Pick the symptom - the matching free tool is one click away.
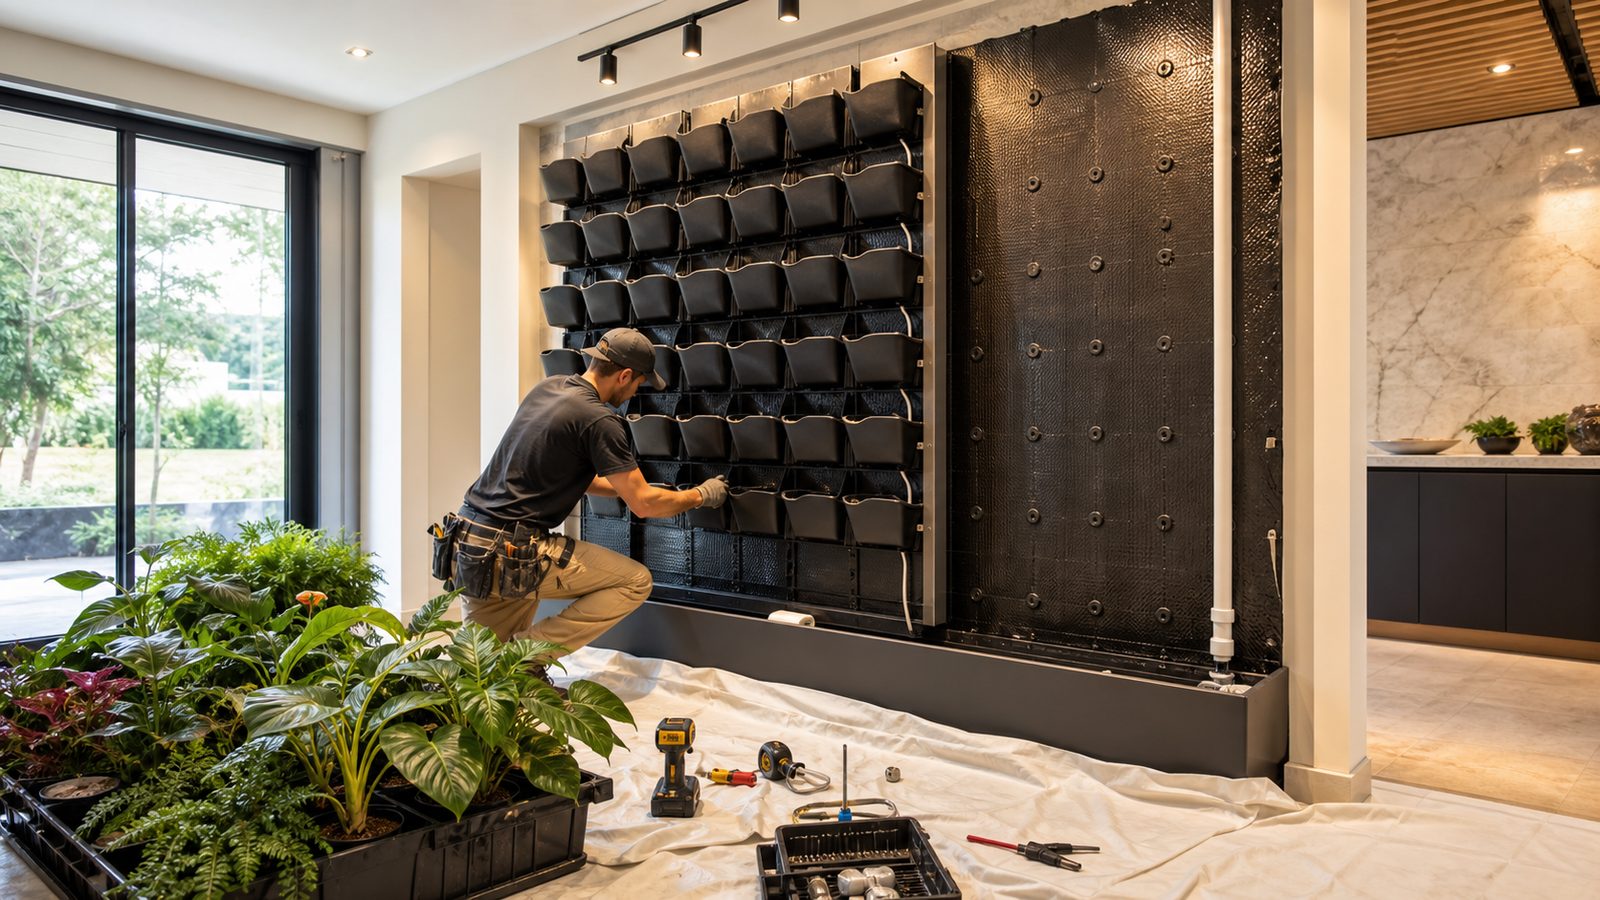
An indoor plant wall can be a weekend feature or a small construction project, depending on size, water, lighting, and expectations. The right way to build one is to treat it like a wet wall assembly first and a design feature second. That means planning for weight, wall protection, drainage, electrical safety, service access, and plant replacement before you buy a single fern.
For most homeowners, the best starting point is an 8 to 20 square foot hand-watered or small recirculating modular wall. It gives you the look without committing to plumbing, a drain line, or commercial-level maintenance. Larger walls, especially anything over about 40 square feet, should be designed more like a built-in: framed support, waterproof backing, grow lighting, irrigation controls, and accessible mechanical components.
On our job sites, the plant walls that last are not the ones with the most plants on day one. They are the ones with boring details done correctly: solid backing, a membrane behind the system, a catch tray or drain, GFCI-protected power, even light coverage, and room to service the pump, timer, filter, and reservoir.
What Counts as an Indoor Plant Wall?
A true indoor living wall is more than a shelf with houseplants. It is usually a modular tray, pocket, panel, felt, hydroponic, rail-mounted, or wall-pot system mounted to a support surface. The system holds plants and growing medium vertically, manages water, and protects the building behind it.
Crashes, No Sound, or Screen Glitches?
Random freezes, missing sound and display glitches usually trace back to one bad driver. Find and replace yours safely.Free scan · under a minutePC Slower Than It Used to Be?
A free scan shows the junk files, broken settings and background clutter dragging Windows down - then fixes them in one click.Free scan · Windows 10 & 11#1 Best Overall
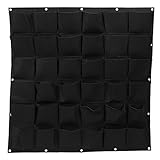
- 【36 Pocket Vertical Garden】Features 36 individual planting pockets, allowing you to grow herbs, flowers, succulents, strawberries, vegetables, and other plants while maximizing vertical space.
- 【Large Growing Area】Measures 39.4 x 39.4 inches, providing ample room for multiple plants. Ideal for balconies, patios, fences, walls, gardens, and other indoor or outdoor spaces.
- 【Breathable Felt Material】Made from durable, eco-friendly felt fabric that retains moisture while allowing excess water to drain, promoting healthy root growth and helping plants thrive.
- 【Easy Installation】Equipped with reinforced grommets for convenient hanging. Easily mount on fences, walls, railings, or other vertical surfaces using zip ties, hooks, nails, or screws.
- 【Indoor & Outdoor Use】Suitable for creating vertical gardens in homes, apartments, patios, balconies, greenhouses, and outdoor living areas. A practical solution for gardeners with limited space.
The basic assembly looks like this: structure, waterproofing, drainage or catchment, planter modules, plants, lighting, and maintenance access. Skip one of those layers and the wall may still look good for a few weeks, but it becomes harder to keep alive and much easier to damage the room.
There are three common residential approaches:
- Wall-mounted pots or rails: Best for small decorative walls, usually 4 to 12 square feet. They are easy to maintain because each plant can be removed.
- Pocket or modular planter panels: Best for 8 to 40 square feet. These give a fuller living-wall look while staying manageable for a homeowner.
- Professionally irrigated living wall systems: Best for large entries, commercial spaces, tall stairwells, and high-end residential installations where consistent water and lighting are required.
If this is your first indoor plant wall, build a test section first. A 2-foot by 4-foot wall, or about 8 square feet, is large enough to expose watering, lighting, and drainage problems before those problems become expensive.
Indoor Plant Wall Costs in 2026
Costs vary because living walls are custom assemblies. A small DIY wall using basic pocket planters may cost less than a new appliance. A large irrigated wall with lighting, plumbing, and maintenance access can cost as much as a specialty millwork installation.
| System Type | Typical 2026 Cost | Best Use | What Drives the Price |
|---|---|---|---|
| Basic DIY pocket or wall-pot system | $20 to $75 per sq. ft. | Small residential feature walls, 4 to 20 sq. ft. | Planters, backing board, waterproof layer, potting mix, starter plants, fasteners |
| Mid-grade DIY modular system | $75 to $150 per sq. ft. | Better-looking residential walls, 8 to 40 sq. ft. | Purpose-built panels, grow lights, timer, drip tray, reservoir, higher-quality tropical plants |
| Professional living wall installation | $100 to $300 per sq. ft. commonly; some turnkey commercial walls reach $150 to $450 per sq. ft. | Large residential, office, lobby, restaurant, or commercial walls | Framing, waterproofing, irrigation, drains, electrical work, plant design, access equipment, labor |
| Professional maintenance | $1.50 to $4.00 per sq. ft. per month | Medium and large living walls | Pruning, fertilizing, pest checks, cleaning, irrigation tuning, plant replacement |
A realistic 20 square foot homeowner wall might cost $400 to $1,500 if it is simple and hand-watered. The same 20 square feet using better modular panels, a waterproof backer, LED grow lighting, timer, and a reservoir can land closer to $1,500 to $3,000. A professional installation of that size often starts around $2,000 and can climb past $6,000 depending on lighting, finish carpentry, and irrigation.
Do not compare a hand-watered wall of removable pots to a plumbed living wall by square foot alone. One is closer to furniture and finish carpentry. The other includes wet mechanical systems, electrical coordination, plant design, and service obligations.
Choose the Right Wall and Size
Pick the location before choosing the plants. The wall needs enough structure to carry saturated weight, enough light to keep plants dense, and enough clearance to water and service the system.
A good first wall is 24 to 48 inches wide and 36 to 72 inches tall. That keeps the project in the 6 to 24 square foot range. It is big enough to make an impact, but small enough that you can inspect every pocket without a ladder.
Avoid these locations unless you have a strong reason and a proper detail:
- Directly over hardwood floors without a drip tray or waterproof floor protection
- Above built-in cabinetry or electronics
- Over outlets, switches, baseboards, or wood trim
- Beside exterior doors where hot or cold drafts hit the plants
- Under HVAC supply vents or returns
- In direct western sun where leaves can burn and the wall dries unevenly
- In dark rooms where you are not willing to add grow lights
Temperature matters. Many tropical green-wall plants perform best around 59 to 77 degrees Fahrenheit. Most homes are in that range, but the wall itself may not be. A plant wall beside a fireplace, uninsulated glass, or forced-air register can experience harsh microclimates even when the thermostat looks normal.
Plan for Weight Before You Mount Anything
A living wall gets heavier after watering. That is the weight that matters. Wet soil, plants, trays, backer board, water in the reservoir, and trim can add up quickly.
As a planning number, a light wall-pot system may be 10 to 20 pounds per square foot when watered. A denser modular or felt-based wall can be 20 to 40 pounds per square foot or more depending on growing medium and water retention. A 4-foot by 6-foot wall at 25 pounds per square foot is about 600 pounds before you count framing or trim.
That does not mean every plant wall needs an engineer. It does mean drywall anchors are not a structural plan. Fasten to studs, blocking, plywood backer, masonry, or a purpose-built frame. For wood-framed walls, we usually want solid blocking or a 3/4-inch plywood backer tied into studs. For heavier or commercial systems, follow the manufacturer’s mounting schedule and verify the substrate.
If you are mounting to drywall, think of the drywall as a finish layer, not the support. The load needs to land on framing. For masonry or concrete, use compatible anchors and account for the wall system’s standoff depth so the assembly stays flat and serviceable.
Build the Wall as a Layered Assembly
The most reliable indoor plant walls are built in layers. Each layer has a job. When homeowners run into trouble, it is usually because the planter was hung directly on painted drywall and the wall was expected to handle water, weight, and humidity with no help.
1. Structure
Start with framing, studs, blocking, masonry, or a freestanding frame. A small rail system may only need studs and proper fasteners. A larger modular wall should have continuous backing, often 3/4-inch exterior-grade plywood or a manufacturer-approved panel, fastened into studs at a predictable spacing.
Rank #2
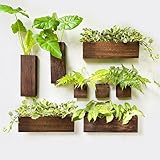
- 8-PACK SET: (13" x 4.5" x 3.5") wall planters for indoor plants. Check and pick the right size for your plants to prevent any unpleasant experiences and potential wastage of resources. Plants NOT included
- EASY TO INSTALL: Ready to hang, these planters can be effortlessly hung on any wall, making installation a breeze.
- SPACE-SAVING SOLUTION: They do not take up any floor space. Hang them on the wall, create a green and refreshing feature wall with your lovely plants or use them as wall vases for artifical plants such as eucalyptus branches or short pampas grass.
- MULTIPURPOSE USE: Besides plants, these versatile planters can also be used for organizing small items or displaying decorative accents, serving as functional decor pieces, Enhance the ambiance of any room with these stylish planters, adding warmth and charm to your living space.
- IDEAL GIFT: Whether for housewarming parties, birthdays, or other special occasions, these wooden planters make a thoughtful and stylish gift for plant enthusiasts or anyone with a penchant for elegant home decor.
2. Waterproof Backing
Painted drywall is not waterproofing. Use a waterproof membrane, PVC or composite backer board, cement board with a compatible waterproofing system, or another approved moisture-resistant assembly. Seal penetrations carefully. Any screw through the membrane should be planned, not random.
3. Drainage and Catchment
Every plant wall needs a place for water to go. For small hand-watered walls, that may be a removable drip tray or trough. For recirculating walls, it may be a lower reservoir with a pump. For open-loop systems, it may be a drain connection. Add a leak detector in the catch tray or reservoir area, especially if the wall is above finished floors, cabinetry, or a lower level.
4. Planter Modules
Use removable modules, pots, or pockets whenever possible. Plants fail occasionally even in well-designed walls. If you cannot replace one plant without taking apart the assembly, maintenance will become frustrating and expensive.
5. Lighting
Plan lighting before plant selection. A room can look bright to people and still be too dim for a living wall. Plant walls need even light across the full surface, not one decorative fixture aimed at the center.
6. Access
Keep pumps, filters, reservoirs, valves, shutoffs, transformers, and timers reachable. A removable lower panel, adjacent cabinet, or accessible side chase is worth building. Hidden mechanical parts eventually become ignored mechanical parts.
Recommended Free Tools
Irrigation: Hand-Watered, Recirculating, or Plumbed?
Water is the main construction risk and the main plant-health variable. The right irrigation choice depends on wall size, budget, homeowner discipline, and how much building work you are willing to do.
| Irrigation Type | Best For | Advantages | Tradeoffs |
|---|---|---|---|
| Hand-watered wall | Small walls under 20 sq. ft. | Lowest cost, simple installation, no pump or plumbing | Easy to overwater or underwater; requires consistent homeowner attention |
| Closed-loop recirculating system | Medium walls without nearby plumbing | Automates watering without a drain or supply tie-in | Reservoir must be cleaned and filled; pump, filter, and water quality need attention |
| Open-loop plumbed system | Large or professional installations | More consistent automation; easier for service teams | Requires supply and drain planning, plumbing coordination, and more upfront cost |
For most small residential walls, hand watering is acceptable if the wall uses removable pots or pockets and has a proper drip tray. For a wall that is 30 to 60 square feet, recirculating irrigation starts to make sense because manual watering becomes uneven. For large walls, tall walls, commercial spaces, or homes where the owner travels often, a plumbed system is usually the cleaner long-term answer.
Use separate controls for water and light. A dedicated timer for grow lights and a separate irrigation timer or controller allow you to adjust each system independently. Plants may need 12 to 14 hours of light but only intermittent watering. Tying those functions together is a maintenance headache.
Lighting Requirements for an Indoor Plant Wall
Lighting decides whether the wall fills in or slowly thins out. Most indoor plant walls need bright indirect light or supplemental LED grow lighting. For tropical species commonly used in living walls, 12 to 14 hours per day is a common target. Some living-wall systems recommend a dedicated outlet and timer set around 14 hours per day, with grow bulbs generally kept under 15 hours per day to avoid stressing plants.
Quick wins for a faster PC:
Clear out junk files and repair common Windows errorsFree Scan →Fix the driver behind crashes, sound loss and screen glitchesFind Drivers →Repair Windows errors before they cause bigger problemsFix Now →The most common lighting mistake is assuming a nearby window is enough. It may be enough at noon in June and nowhere near enough at 4 p.m. in December. Measure the actual light if you can. At minimum, watch the wall for a full day and account for seasonal changes, overhangs, window tint, trees, and blinds.
For a clean residential installation, LED linear fixtures or track-mounted grow lights usually work better than one spotlight. The goal is even coverage from top to bottom and side to side. Tall walls often need more than one row of fixtures because the top can receive strong light while the lower third sits in shade.
Coordinate power early. Pumps, lights, and controllers need outlets. Where water and electricity are near each other, use GFCI-protected receptacles as required by applicable electrical code and local rules. Do not run extension cords behind a wet assembly. If a new receptacle, concealed wiring, or hardwired fixture is needed, bring in a licensed electrician.
Best Plants for Indoor Living Walls
Choose plants by water and light needs first, appearance second. The wall will only be as healthy as the least-compatible plant group. Succulents beside ferns, for example, usually means one plant type is getting the wrong conditions.
The Tool Desk
Outbyte PC Repair FREERepair Windows errors before they cause bigger problemsFix Now →Outbyte Driver Updater FREEFix the driver behind crashes, sound loss and screen glitchesFind Drivers →Reliable indoor plant-wall choices include pothos, philodendron, heartleaf philodendron, ferns, peperomia, hoya, dracaena, syngonium, calathea, spider plant, and other low-light tropicals. These plants are popular because they tolerate interior conditions and can be pruned into a full, layered surface.
For a lower-maintenance wall, use fewer plant varieties. Three to six species are usually enough for a residential feature. Repeating plants creates a more intentional look and makes watering easier. A wall with 20 different plants may look interesting on installation day but becomes harder to diagnose when one section starts failing.
Rank #3

- PREMIUM MATERIAL & WATER-PRESERVING REAR DESIGN - The hanging garden growth bag is made of high-quality and environmentally friendly felt. Practically, this growing bag retain a moderate water level for perfect growing conditions for your plants, such as herbs, strawberries, flowers, vegetables and so on. The rear water-preserving layer of the growing bag effectively protects the wall without stains, and the leakproof design of the bottom does not make your floor dirty.
- DURABLE & VERSATILE - This wall planter is easy to hang up and attach. It is solid and durable and not easy to deform. Being strong corrosion-resistant and breathable, and hung with strong, reinforced metal eyelets and can be stacked with other similar products to cover a large wall area, this product is the best growing bag for tomatoes / herbs / flowers / strawberries / green plants, which helps to bring several plants together to cover large wall areas with free mobility.
- GREAT DECORATIONS - The 18-pockets balcony planter can be used for courtyards, fences, apartments, balconies, patios, campuses, municipalities and roof gardens, for all the places you want to decorate, which will definitely surprise you. When winter comes, wash the bag and put it in the house. This also makes it a perfect storage bag.
- BREATHABLE DESIGN & AUTOMATIC DRAIN - When the plant has enough moisture, the bag automatically leaks excess water to maintain a comfortable growing environment. And the Grow Bag is sturdy and corrosion resistant, and the decorative Plant Bags are really suitable for hanging anywhere, in your room, living room, kitchen, garden and much more.
- WORRY-FREE SHOPPING - Please check the package content as you received the product. At ZOENHOU, we focus on product quality and value the shopping experience of our customers highly. Every product purchased from us comes with a 24/7 friendly customer service. Whenever you have a question, please feel free to contact us!
Plant Grouping Tips
- Group moisture-loving plants together instead of mixing them with dry-soil plants.
- Put trailing plants near edges and upper sections where they can soften lines.
- Use upright plants sparingly so they do not fight gravity or block neighboring plants.
- Keep delicate plants away from vents, doors, and high-traffic corners.
- Budget 5% to 15% plant replacement per year for a well-designed homeowner wall.
Do not install every plant at its mature size. Dense walls look impressive immediately, but plants still need air movement. Overpacking can trap moisture, encourage pests, and make pruning harder.
Step-by-Step: How We Would Build a Small Indoor Plant Wall
This example assumes a 4-foot by 5-foot wall, or 20 square feet, using modular trays or wall-mounted removable planters. It is a realistic size for a dining room, home office, stair landing, or entry wall.
Free tools Windows power users keep installed
One-click scans. No signup required.
Step 1: Confirm the Layout
Mark the finished width and height with painter’s tape. Check sightlines, furniture clearance, baseboards, outlets, switches, and ceiling height. Leave at least 6 to 12 inches of clearance at the bottom for a catch tray, trim, or service panel. If the wall is near a walkway, avoid plants that protrude more than 6 to 8 inches.
Step 2: Locate Studs and Add Backing if Needed
Find studs and confirm spacing. Many homes have studs at 16 inches on center, but do not assume. For a heavier modular wall, install a secured backer panel or blocking so the load is spread across multiple studs. A 3/4-inch plywood backer behind the finished assembly is a practical option when the wall needs consistent fastening points.
Step 3: Install Waterproof Protection
Cover the plant-wall area with a waterproof membrane or moisture-resistant backer system. Extend protection beyond the planter footprint where possible, especially at the lower edge. Seal seams and penetrations. Add flashing or a drip edge that directs water into the tray or reservoir rather than behind the trim.
Step 4: Add Drainage or Catchment
Install the drip tray, trough, or reservoir before planting. Fill it with a small amount of water and check that it sits level. If the system has a pump, run it before plants go in. This is the time to find a bad fitting, noisy pump, pinched tube, or uneven flow.
Do these 3 things before closing this tab:
1Clear out junk files and repair common Windows errors2Fix the driver behind crashes, sound loss and screen glitches3Repair Windows errors before they cause bigger problemsStep 5: Mount the Planter System
Fasten the modular trays, rails, or panels according to the manufacturer’s layout. Use corrosion-resistant fasteners where they may be exposed to moisture. Keep the system plumb and level. A small error at the first row becomes obvious by the top of the wall.
Step 6: Install Lighting and Controls
Mount grow lights so the full wall receives even light. Set the light timer for roughly 12 to 14 hours per day, then adjust based on plant response. Keep transformers, timers, and cord connections out of wet zones and accessible for service.
Step 7: Plant by Zones
Install plants with similar water needs together. Place fuller plants first, then add trailing and accent plants. Water lightly after installation and watch the drainage path. Do not soak the wall on day one unless the system manufacturer specifically calls for it.
Step 8: Tune the Wall for 90 Days
The first 90 days matter most. Light, water, HVAC conditions, and plant stress are all being tested. Expect some pruning, a few plant swaps, and watering adjustments. For upscale residential installations, a maintenance plan during this period is money well spent.
Permits, Electrical Safety, and Code Considerations
A small hand-watered plant wall that uses existing outlets and no plumbing may not require a building permit in many areas, but local rules control. Once you add new electrical circuits, hardwired lighting, concealed wiring, plumbing supply, drain connections, or structural changes, permits may be required.
Electrical safety deserves special attention because living walls combine water, pumps, lighting, and human contact. Use GFCI-protected power where required. Keep cords visible or properly routed, avoid extension cords in concealed spaces, and do not bury plug connections behind the planted assembly. If the wall needs a new receptacle, dedicated circuit, or hardwired lighting, hire a licensed electrician.
For plumbing, a recirculating reservoir is simpler because it avoids a supply and drain tie-in, but it still needs overflow planning. An open-loop system needs proper plumbing design, shutoff access, and backflow considerations where applicable. In a commercial space, expect the project to involve building management, fire/life-safety review, and maintenance documentation.
Moisture is also a building-health issue. Mold needs moisture to grow. Keep water contained, allow air movement, clean reservoirs, and fix leaks immediately. If you smell mustiness, see staining, or notice soft drywall, stop watering and inspect behind the system.
Do these 3 things before closing this tab:
1Repair Windows errors before they cause bigger problems2Scan for outdated or missing drivers - takes under a minute3Clear out junk files and repair common Windows errorsMaintenance: What It Really Takes
A living wall is not maintenance-free. It is a vertical garden indoors. Plan for weekly observation, regular pruning, water checks, cleaning, fertilizing, pest monitoring, and occasional plant replacement.
Rank #4

- Self-watering system means you can often go weeks without watering plants
- Real plants improve health, focus & creativity without taking floor space
- Durable plastic build with modern matte finish looks great in any space
- Only a small nail required for installation - no big holes or wall damage
- Designed by a plant lover for fellow plant lovers
For a homeowner-managed wall, a practical schedule looks like this:
- Weekly: Check soil moisture, inspect the drip tray or reservoir, wipe visible water spots, remove dead leaves, and look for pests.
- Every 2 to 4 weeks: Prune leggy growth, rotate or replace struggling plants, clean accessible planter edges, and confirm the light timer is working.
- Monthly: Check pump operation, clean filters if present, inspect tubing, and review whether any lower pockets are staying too wet.
- Seasonally: Adjust watering for HVAC changes, lower winter light, summer sun, humidity shifts, and plant growth.
Professional maintenance commonly costs $1.50 to $4.00 per square foot per month. For a 40 square foot wall, that is roughly $60 to $160 per month. For a 100 square foot lobby wall, it is closer to $150 to $400 per month. That service usually includes pruning, cleaning, fertilizing, pest checks, irrigation adjustments, and replacing failed plants depending on the contract.
Even with good care, budget for plant replacement. A well-designed residential wall may lose 5% to 15% of plants annually. More loss usually points to a design problem: uneven light, overwatering, incompatible plants, HVAC drafts, poor drainage, or inaccessible maintenance points.
Free tools Windows power users keep installed
One-click scans. No signup required.
Common Mistakes That Cause Indoor Plant Walls to Fail
The biggest mistake is treating the wall like artwork instead of a wet building assembly. Art does not get watered. A plant wall does, and that changes everything.
These are the failures we watch for:
- Mounting heavy systems with drywall anchors instead of studs, blocking, or structural backing
- Assuming painted drywall is enough protection from water
- Skipping the drip tray, overflow path, or leak detector
- Using decorative lamps instead of real grow lighting
- Mixing plants with different water needs in the same irrigation zone
- Installing over wood trim, outlets, or finished flooring without protection
- Hiding pumps, filters, valves, and timers where no one can reach them
- Overwatering because the top pockets look dry while lower pockets stay saturated
- Ignoring HVAC drafts from vents, doors, fireplaces, or sunny glass
- Failing to budget for pruning, fertilizing, cleaning, pest checks, and replacements
Most of these are preventable during layout. Once the wall is planted, fixing them gets harder because every repair means working around live material and moisture.
When to DIY and When to Hire a Pro
DIY makes sense when the wall is small, hand-watered, accessible, and mounted to a straightforward wall with known framing. If you are building a 2-foot by 4-foot or 4-foot by 5-foot feature with removable planters, no plumbing, plug-in lighting, and a visible drip tray, a careful homeowner can usually handle it.
Hire a pro when the wall is large, heavy, irrigated, hardwired, mounted high, placed over expensive finishes, or integrated into cabinetry. Also hire help if you need new outlets, a drain, a water supply, structural backing, or concealed access panels. Those are construction details, not plant-care details.
Quick wins for a faster PC:
Fix the driver behind crashes, sound loss and screen glitchesFind Drivers →Clear out junk files and repair common Windows errorsFree Scan →Scan for outdated or missing drivers - takes under a minuteDriver Scan →A good dividing line is risk. If a leak would only wet a removable tray, DIY is reasonable. If a leak could damage hardwood, cabinets, drywall, electrical devices, or a room below, bring in a contractor, electrician, plumber, or living-wall specialist before installation.
For high-end homes, we also recommend planning the first 90 days as part of the project. That means a clear maintenance schedule, replacement plant budget, and at least one follow-up visit to adjust watering and lighting after the plants acclimate.
The Bottom Line
The best indoor plant wall is designed like a small building system. Start with structure, protect the wall from moisture, create a controlled drainage path, choose lighting based on the plants, keep water and electrical components serviceable, and use plants that want the same conditions.
If you keep the first wall modest, around 8 to 20 square feet, you can learn how the room behaves before committing to a larger feature. Done correctly, an indoor living wall can be beautiful and durable. Done casually, it becomes a maintenance problem mounted to drywall. The difference is planning the hidden details before the green part goes in.
Frequently Asked Questions
How much does an indoor plant wall cost in 2026?
A basic DIY indoor plant wall typically costs about $20 to $75 per square foot. A better modular DIY system with grow lights and waterproofing is closer to $75 to $150 per square foot. Professional living walls commonly run $100 to $300 per square foot installed, with some turnkey commercial systems reaching $150 to $450 per square foot.
Can you build a living wall on drywall?
You can install a plant wall in front of drywall, but drywall should not be treated as the structural or waterproof layer. The system should fasten into studs, blocking, plywood backing, masonry, or another approved support, with waterproof protection between the plants and the wall.
Do indoor plant walls need irrigation?
Small plant walls can be hand-watered if they have removable pots or pockets and a reliable drip tray. Larger walls are usually better with automated irrigation. Recirculating systems avoid plumbing tie-ins but need reservoir maintenance, while open-loop systems require supply and drain planning.
How many hours of grow light does an indoor plant wall need?
Many indoor tropical plant walls need about 12 to 14 hours of supplemental grow light per day. Avoid running grow bulbs beyond about 15 hours daily unless the plant system specifically calls for it. Even light coverage matters more than one bright decorative fixture.
How do you keep an indoor plant wall from leaking or growing mold?
Use a waterproof membrane or moisture-resistant backer, hold the planted layer off the wall, provide a drip tray or drain path, keep pumps and reservoirs accessible, and add a leak detector. Mold risk rises when leaks, trapped moisture, poor drainage, or stagnant air are ignored.
What are the best plants for an indoor living wall?
Good choices include pothos, philodendron, ferns, peperomia, hoya, dracaena, syngonium, calathea, spider plant, and other low-light tropicals. Group plants by similar water and light needs rather than choosing by looks alone.
Quick Recap
Product prices and availability are accurate as of the date/time indicated and are subject to change. Any price and availability information displayed on Amazon at the time of purchase will apply.


Leave a Reply