Some links on this page are affiliate links: if you buy through them we may earn a commission, at no extra cost to you.
You can build a simple local motion-warning system with four main stages: a PIR sensor detects a change in infrared radiation, an Arduino Nano recognizes the motion event, a DFPlayer Mini selects a prerecorded audio file, and a speaker plays the warning.
This is a DIY audible deterrent—not a professionally monitored security system. It does not contact emergency services, provide remote notifications, verify motion with a camera, or guarantee detection.
How the system works
Motion → PIR HIGH → Arduino detects event → DFPlayer plays 0001.mp3 → SpeakerA PIR sensor, or passive infrared sensor, detects changes in infrared radiation from moving warm objects. It does not identify people with certainty and may also respond to pets, sunlight, heaters, vents, or other temperature changes.
Quick wins for a faster PC:
Clear out junk files and repair common Windows errorsFree Scan →Fix the driver behind crashes, sound loss and screen glitchesFind Drivers →The Arduino Nano reads the PIR’s digital output. When a new motion event is detected, it sends a serial command to the DFPlayer Mini. The DFPlayer reads a prerecorded file from a microSD card and drives a small speaker.
#1 Best Overall
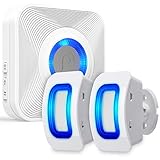
- [MONITOR THE AREAS MOST IMPORTANT TO YOU WITH WAVELINK WIRELESS MOTION DETECTOR ALARM] WaveLink home wireless alarm and motion sensor with 2 security sensors offers a generous detection area of nearly 17 feet at 110°. Big enough to effectively act as a window, door, or driveway alarm. Expand the system by pairing up to 10 receivers to one door sensor, or 10 door sensors to one receiver. It can also be used the same way at any business.
- [58 UNIQUE CHIMES] 58 unique ringtones and chimes allow your wireless window, driveway and door sensor to meet any need.
- [PROVIDE PEACE OF MIND FOR THE HEARING IMPAIRED] With the built-in LED indicator, the wireless motion sensor alarm offers additional assistance when coupled with the receiver to the hearing impaired. Difficulty hearing is no problem with WaveLink wireless system.
- [WIRE FREE] No-wire in-wall installation. Fosmon's Wireless Doorbell Sensor can be battery operated for fast and easy use. All hardware is included, and ready to use. It gives you the opportunity to spend your time elsewhere.
- [LIMITED LIFETIME WARRANTY] The Fosmon WaveLink wireless door chime and its components come with a limited lifetime warranty
The DFPlayer Mini supports FAT16/FAT32 cards up to 32 GB according to DFRobot’s documentation, communicates at 9600 baud, offers volume levels from 0 to 30, and can drive a small speaker directly through its SPK1 and SPK2 outputs.
Parts and tools
| Part | Quantity | Purpose |
|---|---|---|
| Arduino Nano or compatible ATmega328P board | 1 | Main controller |
| DFPlayer Mini | 1 | Audio playback |
| PIR sensor, such as AM312 or HC-SR501 | 1 | Motion detection |
| Small 8-ohm speaker | 1 | Voice output |
| microSD/TF card | 1 | Stores the audio file |
| 1 kΩ resistor | 1 | Recommended on the Nano TX line |
| Breadboard and jumper wires | 1 set | Temporary assembly |
| USB cable and suitable power source | 1 | Programming and power |
The component list follows the original reference build described by Hackster. For a permanent installation, add an enclosure, an on/off switch, a status LED, and a regulated power supply. A larger speaker or external amplifier may be needed for a loud outdoor warning.
Choose the PIR carefully
An AM312 is compact and commonly used at 3.3 V. An HC-SR501 is larger but usually includes sensitivity and timing adjustments. Exact voltage requirements, output behavior, and controls vary by module, so check the documentation for the specific board rather than assuming that every “mini PIR” is interchangeable.
The Tool Desk
Outbyte Driver Updater FREEFix the driver behind crashes, sound loss and screen glitchesFind Drivers →Outbyte PC Repair FREERepair Windows errors before they cause bigger problemsFix Now →Most PIR modules need a warm-up period after power is applied. Their output may also remain HIGH for a configurable hold time. Motion across the sensor’s field of view is generally easier to detect than someone walking directly toward it.
Prepare the spoken audio
The most reliable documented arrangement is a root-level mp3 folder containing a four-digit numbered file:
microSD root/
└── mp3/
└── 0001.mp3- Use a small, reputable microSD card.
- Format it as FAT32 where supported by the card and computer.
- Create a folder named exactly
mp3at the card’s root. - Copy the spoken message into that folder as
0001.mp3. - Eject the card properly and insert it before initializing the DFPlayer.
DFRobot documents this folder and naming structure in its DFPlayer reference. It also notes that file-copy order can affect numeric playback behavior on some configurations. Do not assume that every clone, firmware version, codec, or card will behave identically.
Keep the message short and record it without a long silent lead-in. Suitable examples include “Motion detected,” “Please leave the area,” or “Movement detected in the storage room.” A spoken warning is a deterrent message; it does not create legal authority or replace an alarm-code procedure.
Free tools Windows power users keep installed
One-click scans. No signup required.
On macOS, DFRobot warns that hidden ._ files can interfere with playback and documents using the dot_clean command to remove them. Follow the manufacturer’s current instructions if those files appear on the card.
Rank #2

- 【61 Premium Melodies with 120dB Adjustable Alerts】Enjoy the industry's most extensive chime selection with 60 customizable melodies and 1 emergency alarm tone. Five precise volume levels (0-120dB) adapt to any environment, from quiet bedrooms to bustling storefronts. The exclusive silent mode maintains peace when needed.
- 【Advanced 6m/110° Motion Detection Technology】Our precision-tuned PIR sensor detects movement within 6 meters (20 feet) at a 110° wide angle, with intelligent heat-signature recognition to reduce false triggers. The 1000ft wireless transmission maintains reliable connectivity through walls and floors, supported by weather-resistant components that operate from -4°F to 140°F.(Note: If the alarm is triggered, the doorbell will sound an alert every 10 seconds.)
- 【Dual Alert System with Visual & Audio Alerts】Our notification system combines a RGB light with a 120dB audible alarm, ensuring reliable detection in any environment. The flashing visual alert remains clearly visible in direct sunlight or complete darkness, while the adjustable-volume chime accommodates different noise levels.
- 【Flexible & Easy Installation】Setup is simple and fast. After pairing via the included instructions, mount the infrared sensor anywhere you need using the included stand and screws. No wiring required — just install and start protecting your space.
- 【Multi-Scene Security Solution for Home & Business】This versatile alarm system provides reliable 24/7 protection for homes, offices, retail stores, and warehouses, serving as both a welcoming doorbell and security monitor. Its weather-resistant design delivers consistent performance as an elderly care assistant, child safety monitor, and customer entry notifier - all with energy-efficient operation that meets rigorous industry standards for continuous use in any environment.
Wire the circuit
| Arduino Nano | Connect to | Notes |
|---|---|---|
| 5V | DFPlayer VCC | Confirm the exact module’s supply requirements |
| GND | DFPlayer GND | All devices need a common ground |
| D10 | DFPlayer TX | SoftwareSerial receive pin |
| D11 through 1 kΩ resistor | DFPlayer RX | Recommended series resistor |
| D9 | PIR OUT | Digital motion signal |
| 5V or 3.3V | PIR VCC | Depends on the PIR module |
| GND | PIR GND | Common ground |
| DFPlayer SPK1 | Speaker terminal 1 | Direct speaker output |
| DFPlayer SPK2 | Speaker terminal 2 | Use both speaker outputs |
Serial connections are crossed: Arduino TX goes to DFPlayer RX, while DFPlayer TX goes to Arduino RX. The reference project uses Nano pins 10 and 11 for SoftwareSerial and pin 9 for the PIR input. The DFPlayer serial link uses 9600 baud.
Place the 1 kΩ resistor between Nano D11 and DFPlayer RX. DFRobot recommends this arrangement to reduce noise and improve signal compatibility when a 5 V Arduino communicates with the module.
Do not connect one speaker lead to ground when using the DFPlayer’s SPK1/SPK2 output. This is a bridged output; the speaker should connect between SPK1 and SPK2. Confirm the labels on your particular board, especially if it is a clone.
Install the Arduino software
- Install the Arduino IDE.
- Install the
DFRobotDFPlayerMinilibrary through the Library Manager or the manufacturer’s documented source. - Connect the Nano by USB.
- Select the correct board and processor variant.
- Select the correct serial port.
- Upload the sketch below.
- Open Serial Monitor at 115200 baud.
The Nano communicates with the DFPlayer at 9600 baud in the sketch, while the USB Serial Monitor uses 115200 baud.
Upload a nonblocking motion-triggered sketch
The original reference approach waits 20 seconds with delay(20000). That is easy to understand but stops the controller from doing other work during the delay. The following version detects a new HIGH transition and uses millis() for the cooldown.
#include <SoftwareSerial.h>
#include <DFRobotDFPlayerMini.h>

const byte PIR_PIN = 9;
const byte DF_RX_PIN = 10;  // Arduino receives from DFPlayer TX
const byte DF_TX_PIN = 11;  // Arduino transmits to DFPlayer RX

const unsigned long COOLDOWN_MS = 20000;

SoftwareSerial dfSerial(DF_RX_PIN, DF_TX_PIN);
DFRobotDFPlayerMini player;

bool previousMotion = false;
unsigned long lastPlayback = 0;

void setup() {
  pinMode(PIR_PIN, INPUT);

  Serial.begin(115200);
  dfSerial.begin(9600);

  Serial.println(F("Initializing DFPlayer..."));

  if (!player.begin(dfSerial)) {
    Serial.println(F("DFPlayer initialization failed."));
    Serial.println(F("Check power, wiring, speaker, and microSD card."));
    while (true) {
      delay(100);
    }
  }

  player.volume(20);  // Valid range: 0–30
  Serial.println(F("System ready. Allow the PIR sensor to stabilize."));
}

void loop() {
  bool motion = digitalRead(PIR_PIN) == HIGH;
  unsigned long now = millis();

  bool newMotionEvent = motion && !previousMotion;
  bool cooldownExpired = (now - lastPlayback) >= COOLDOWN_MS;

  if (newMotionEvent && cooldownExpired) {
    Serial.println(F("Motion detected."));
    player.play(1);
    lastPlayback = now;
  }

  previousMotion = motion;
  delay(20);
}
The play(1) command selects the first numbered track according to the DFPlayer’s indexing. The documented API uses begin(), volume(0–30), and play(1); see DFRobot’s API reference.
newMotionEventprevents repeated commands while the PIR output remains HIGH.COOLDOWN_MSlimits how often a message can start.millis()keeps the controller available instead of blocking for 20 seconds.lastPlaybackbegins at zero, so the first valid event can play immediately after startup.
Test the system in stages
1. Test the PIR
Before combining the hardware, temporarily print the PIR state to Serial Monitor or connect an LED through an appropriate resistor. Allow the sensor to stabilize, then walk across its field of view. Confirm that the output changes between LOW and HIGH.
Recommended Free Tools
2. Test the DFPlayer
With the microSD card inserted, run a minimal test that initializes the DFPlayer and calls player.play(1). If it does not play, solve the card, wiring, speaker, and power problem before involving the PIR.
Rank #3
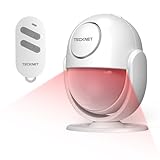
- 【125dB Ultra Loud Volume】This motion detector alarm features a 125dB loud siren. It's easy to operate and emits crisp, loud sound to deter thieves, mischievous kids and stray animals. This wireless mobile sensor can be powered by AAA batteries or plugged in, so you don't have to worry about running out of power and losing protection in an emergency.
- 【More Accurate & Easy to Use】The motion alarm uses the latest PIR motion detection technology and intelligent analysis algorithms to accurately distinguish between interference signals and human motion, significantly reducing false alarm rates. It's easy to use and can protect your kitchen, stairs, garage, shop, boat, van, and more.NOTE: In Alarm Mode, the alarm will sound continuously for 2 minutes once triggered.
- 【2 Modes & 328ft Remote Control】The motion sensor alarm indoor siren operates in two modes: doorbell mode or alarm mode, allowing you to switch flexibly based on your needs. You can use it to alert visitors or deter intruders with a loud alarm. The motion sensor doorbell volume can be adjusted to your needs (80dB-100dB-125dB), ensuring an effective warning without disturbing others.The 328ft remote control that comes with the motion sensor indoor alarm is easy to use and has arming, disarming, alarming, and mode switching functions. In an emergency, press the emergency SOS button on the remote control and the host will immediately sound the alarm.
- 【26ft Detection Distance & 120°Detection Angle】The indoor motion sensor alarm has an infrared detection range of 16-26 feet and can accurately detect within a 120° range. When an intrusion is detected, the motion sensor alarm immediately activates a 125dB alarm and strobe light, providing a dual warning and super deterrent effect.The alarm can rotate 360°, and you can adjust it to detect the direction you want.
- 【Portable & Easy to Install】Compact and lightweight, this motion sensor alarm is ideal for seniors. You can easily use it to protect your van or campsite, whether you're out for work or leisure, or to protect your family at home. As part of a home security system, wireless motion detector provides all-weather protection. And, it's easy to install using the provided sticker or screws. You can also place it on a table or in your car.
3. Combine the modules
Upload the complete sketch, power-cycle the system, wait for the PIR warm-up period, and walk across the detection area. The Serial Monitor should report initialization followed by “Motion detected.” The speaker should play 0001.mp3.
4. Install the enclosure last
Do not enclose the circuit until the sensor angle, message volume, cooldown, and power supply have been tested. An enclosure can restrict the PIR lens, trap heat, or make wiring faults harder to diagnose.
Independent reader supportYour contribution helps us test, update, and keep practical guides available for everyone.Tune the PIR and prevent false triggers
Position the sensor so that people cross its detection zones. Avoid aiming it at:
- Heating or cooling vents.
- Radiators and other heat sources.
- Windows with direct sunlight.
- Moving curtains.
- Areas frequently crossed by pets.
- Rapidly changing indoor temperatures.
If your HC-SR501 includes sensitivity, delay, or retrigger controls, adjust one setting at a time and test again. A PIR detects movement rather than a stationary person, so a person who stops may no longer hold the output HIGH.
For higher confidence, use two sensors and require both to trigger, or add camera verification. These changes reduce some false alarms but add wiring, software, power, and maintenance requirements.
Troubleshooting
“DFPlayer initialization failed” appears
- Check DFPlayer VCC and GND.
- Confirm that Nano and DFPlayer share ground.
- Check the crossed TX/RX connections.
- Confirm that SoftwareSerial pin order matches the sketch.
- Insert the microSD card before initialization.
- Verify the
mp3/0001.mp3layout and card formatting. - Check the 1 kΩ resistor on Nano TX to DFPlayer RX.
- Try a stable power source.
- Confirm that the library is installed correctly.
- Consider that the board may be a defective or incompatible clone.
The original project also reports initialization failure and directs builders to check wiring and the SD card. See its reference instructions.
The DFPlayer initializes but there is no sound
- Make sure the speaker is connected between SPK1 and SPK2.
- Check that volume is not zero.
- Confirm the file is in
mp3/0001.mp3. - Try a known-good card and a short audio file.
- Check that the speaker is not damaged.
- Check for power sag or resets during playback.
- Confirm that the board’s output labels match the wiring.
The message repeats continuously
The PIR may hold its output HIGH, the sensor may be in retrigger mode, or the code may be issuing play(1) on every loop. Use the rising-edge logic above, retain a deliberate cooldown, and adjust the sensor’s hold-time controls. A BUSY-pin connection can provide more precise information about whether audio is currently playing, but verify the polarity and logic level for the exact DFPlayer board before adding code.
Do these 3 things before closing this tab:
1Repair Windows errors before they cause bigger problems2Fix the driver behind crashes, sound loss and screen glitches3Clear out junk files and repair common Windows errorsThe system produces false positives
Reposition the sensor away from sunlight, vents, heaters, and pet traffic. Check for loose wiring and unstable power. Reduce sensitivity where possible and lengthen the cooldown. Test at different times of day because sunlight and temperature changes can alter behavior.
Rank #4

- IS335 WIRED PIR Motion Detector, 40' x 56' by Honeywell
The sensor never triggers
Allow the warm-up period to finish, verify the PIR’s supply voltage, check the output pin, and test movement across rather than directly toward the sensor. Confirm that the sensor is not aimed too high, too low, or behind an enclosure that blocks its lens.
Audio is distorted or the Arduino resets
Lower the DFPlayer volume, use a better-regulated supply, secure the grounds, and keep speaker wiring away from serial wiring where practical. Do not exceed the speaker’s rating. A separate amplifier may be appropriate when more volume is required, but it needs its own suitable power and signal connections.
Possible upgrades
Add a status LED
An LED can indicate power, PIR activity, or a successful initialization. Include the appropriate current-limiting resistor.
Add BUSY-pin handling
The DFPlayer BUSY output can help prevent a new command while audio is playing. The exact active level and behavior should be checked against the particular module revision before wiring it to an Arduino input.
Use an ESP32 for network features
An ESP32 is a better starting point if you need Wi-Fi notifications, a web dashboard, camera integration, or several sensors. It introduces different GPIO, power, software, and logic-level considerations, so it is not a necessary upgrade for a basic offline voice alert.
Choose a different audio board
An Adafruit Audio FX Sound Board can simplify GPIO-triggered playback but generally costs more and is less closely aligned with the Nano-plus-DFPlayer design. A buzzer or siren is cheaper and may be louder, but it cannot play a natural spoken message.
Limitations and safety
This project has no battery backup, encrypted communications, tamper detection, alarm certification, automatic emergency dispatch, event history, or guaranteed detection. It should not be the sole protection for life-safety applications or a substitute for a code-compliant, professionally monitored alarm system.
Windows Errors? Fix Them Before They Spread
Repair common Windows errors and clear accumulated junk for a smoother, more stable PC - no reinstall needed.Free scan · no reinstallOutdated Drivers Are Slowing You Down
One free scan finds every outdated or missing driver and matches the right update for your exact hardware.Free scan · exact hardware matchFor construction sites, workshops, or permanent installations, use a protected enclosure, secure low-voltage wiring, and a power supply appropriate for the environment. Do not connect mains wiring directly to this breadboard circuit, and do not treat an unprotected lithium cell as a drop-in battery solution.
The result is best understood as a low-cost, local voice alert: useful for a room, storage area, workshop, or tabletop demonstration, provided its limitations are clear.
Quick Recap
Product prices and availability are accurate as of the date/time indicated and are subject to change. Any price and availability information displayed on Amazon at the time of purchase will apply.


Leave a Reply