Some links on this page are affiliate links: if you buy through them we may earn a commission, at no extra cost to you.
The correct way to wire a horn speaker depends on its input type. A transformer-equipped 25 V, 70 V/70.7 V, or 100 V horn connects to the amplifier’s matching constant-voltage terminal and COM. A bare 4 Ω or 8 Ω horn connects only to an amplifier rated for that impedance. Multiple constant-voltage horns are wired in parallel, and their selected wattage taps must stay within the amplifier’s continuous output rating.
Safety first
Stop if you cannot identify the speaker terminals or amplifier output. Turn the amplifier off, unplug it, and isolate it before opening terminals or changing transformer taps. Constant-voltage audio outputs are not household mains, but energized 70 V and 100 V speaker terminals can still present a shock hazard. TOA specifically warns against touching high-voltage output terminals during operation (TOA operating instructions).
For fire-alarm, emergency voice, evacuation, or mass-notification systems, use the system designer, authority having jurisdiction, and a qualified installer. Speaker listing, supervision, backup power, wiring survivability, intelligibility, and amplifier compatibility all matter.
The Tool Desk
Outbyte Driver Updater FREEFix the driver behind crashes, sound loss and screen glitchesFind Drivers →Outbyte PC Repair FREERepair Windows errors before they cause bigger problemsFix Now →What you need
- The speaker’s model-specific manual and wiring diagram
- An insulated screwdriver and suitable connectors
- Cable rated for the environment and local code requirements
- A cable tester or continuity tester
- A constant-voltage impedance/load meter when the existing system load is unknown
Step 1: Identify the horn speaker
A horn speaker normally uses a compression driver and acoustic horn to produce directional, intelligible sound. That makes it useful for paging, alarms, intercoms, farms, warehouses, schools, transportation areas, and outdoor signaling.
#1 Best Overall
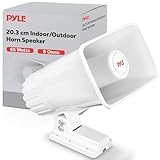
- CLEAR & LOUD SOUND: This heavy duty PA speaker is a perfect tool if you want to make your voice or music louder. It features 8 ohms impedance & 101bd output, making it ideal for outdoor & indoor spaces
- GREAT FREQUENCY RESPONSE: Efficient enough to achieve your desired response, this 8” power horn can amplify up to 500 Hz - 5 KHz
- 65-WATT POWER RATING: Amplify your sound with clarity with this heavy duty PA speaker system. It produces powerful 65 watt sound which is enough to achieve your desired loudness
- ADJUSTABLE BRACKET: The horn speaker can be bent & adjusted. For easy maneuverability, the 8-inch ABS horn is equipped with a 180 degree swiveling adjustable bracket
- MOUNTING BRACKET INCLUDED: Mounting bracket & hardware are included to make installation easier. The power horn only weighs 2.75 lbs & measures 8" H x 4.5" W x 9'' D
Its shape does not tell you how it connects. Horns may be:
- Low-impedance 4 Ω or 8 Ω models
- Transformer-equipped 25 V, 70 V/70.7 V, or 100 V models
- Dual-mode products with both low-impedance and distributed-audio connections
- Older horns using an external transformer
- Specialized emergency products containing supervision components
Record the manufacturer, model number, terminal labels, tap selector, external transformer, and any capacitor or line-supervision component. Look for markings such as 25 V, 70 V, 70.7 V, 100 V, COM, 8 Ω, and 4 Ω. Treat wire colors as non-authoritative: the manual and terminal markings take priority.
For example, the AtlasIED AP-15TU is a 15-watt horn with a built-in selectable 25/70.7 V transformer and a seven-position wattage/impedance selector. That arrangement is model-specific, not a universal horn-speaker wiring standard (AtlasIED AP-15TU).
What’s actually slowing this PC down?
Pick the symptom - the matching free tool is one click away.
Step 2: Identify the amplifier output
Check the amplifier’s rear-panel labels and manual. It may provide:
4 Ωor8 Ωlow-impedance outputs25 Vconstant-voltage output70 Vor70.7 Vconstant-voltage output100 Vconstant-voltage outputCOM,COMMON, or a designated return terminal
A 70 V output is not another name for an 8 Ω output. It is a distributed-audio output intended to drive transformer-equipped speakers. A TOA amplifier example separately identifies 25 V and 70 V outputs from its 4 Ω and 8 Ω outputs (TOA A-903MK2 instructions).
Rank #2

- Powerhorn 8 Ohms, 50W RMS
In the United States, 70 V systems are common; 100 V systems are more common in many overseas installations. “70 V” commonly refers to approximately 70.7 V RMS (HARMAN’s constant-voltage guide).
Step 3: Understand the transformer and taps
A matching transformer has two functional sides:
- Primary: connects to the distributed 25 V, 70 V, or 100 V line. Its wattage taps determine how much power the speaker draws.
- Secondary: connects to the driver and matches its impedance, commonly 4 Ω or 8 Ω.
An integrated transformer may expose only COM and several voltage or wattage terminals. An external transformer requires the exact primary and secondary wiring shown in its manual. HARMAN explains that the primary tap selects power while the secondary tap must match the driver impedance (HARMAN guide).
Do not confuse a wattage tap with an impedance tap. Some selectors show watts; others show impedance values. Use the manufacturer’s table. For example, the TOA MT-S0601 provides an 8 Ω secondary and 70 V/100 V primary taps, including 60 W, 30 W, 15 W, and 7.5 W options on 70 V. Its documentation also warns against using the 83 Ω tap on a 100 V line (TOA MT-S0601 manual).
Step 4: Wire one 70 V horn
For a transformer-equipped 70 V horn, the generic arrangement is:
Amplifier 70 V terminal  ─────────  Speaker 70 V or selected wattage tap
Amplifier COM terminal   ─────────  Speaker COM
- Turn off and unplug the amplifier.
- Confirm that the horn is rated for 70 V or 70.7 V operation.
- Set the speaker selector to the desired 70 V wattage tap.
- Connect the amplifier’s
70 Vterminal to the speaker’s 70 V input or selected 70 V tap. - Connect the amplifier’s
COMto the speaker’sCOMor return terminal. - Tighten the terminals and protect them from moisture, accidental contact, and strain.
- Inspect the cable for shorts before reconnecting the amplifier.
- Power up at low level and test speech or a suitable tone.
Some products label terminals only by wattage rather than providing a separate “70 V” terminal. Follow the supplied diagram instead of guessing.
Rank #3

- MULTIPURPOSE: Indoor and outdoor safety officers, mentors, police, firefighters, cheerleaders, school sports, outdoor games and occasions. Event organizers and directors love this compact and versatile megaphone
- VOICE AMPLIFIER MODE: Amplifies sound projected into the microphone. This mini electronic bullhorn produces 20 watts of sound that can cover 1000 yards.
- BATTERY OPERATED AND PORTABLE: This compact megaphone speaker operates on (4) x ‘C’ batteries (not included), ensuring long-lasting performance. Its quick folding handle and light-weight chassis make it perfect for on-the-go use.
- ADJUSTABLE VOLUME CONTROL: The megaphone speaker comes equipped with an adjustable volume control, allowing you to modify the sound to your preference. The power-saving OFF switch helps preserve battery life.
- ERGONOMIC DESIGN: Designed with an ergonomic pistol grip, this speaker is comfortable to hold. Its compact size and portability make it an excellent choice for self defense, to replace an air horn, or instead of a whistle for coaches.
Step 5: Wire one 25 V horn
Amplifier 25 V terminal  ─────────  Speaker 25 V or selected wattage tap
Amplifier COM terminal   ─────────  Speaker COM
Use the tap table for the actual 25 V line. Do not assume that a 70 V tap and a 25 V tap deliver the same power, or that a 70 V-only horn can be connected to 25 V. If a dual-voltage speaker supports both, select the position documented for the amplifier’s voltage.
Recommended Free Tools
Step 6: Wire a low-impedance horn
A bare 8 Ω horn connects to an amplifier output rated for 8 Ω:
Amplifier 8 Ω output or positive terminal  ─────  Speaker positive
Amplifier COM or negative terminal         ─────  Speaker negative
A 4 Ω horn requires an amplifier rated for a 4 Ω load. Never connect a low-impedance horn directly to a 70 V or 100 V output. Install a correctly rated matching transformer if you need to use that horn on a distributed line.
Conversely, do not connect a transformer-equipped 70 V horn to a conventional 4 Ω or 8 Ω output as though it were a bare driver. If the product has both direct 8 Ω leads and transformer taps, use one connection mode only unless the manual explicitly shows another arrangement.
Step 7: Wire multiple horns in parallel
Transformer-equipped constant-voltage horns are normally wired in parallel, not series:
Rank #4

- 20 WATT POWER: Amplify your sound with clarity with this heavy-duty PA horn speaker. It produces high powered 20 watt sound which is enough to achieve your desired loudness so you can play your favorite tracks as loud as you want and with style
- 400Hz - 5KHz FREQUENCY RESPONSE: Efficient enough to achieve your desired response, this 9.7-inch compact horn pa outdoor loudspeaker audio horn speaker has 8-ohm impedance, 102dB SPL, & 400Hz - 5KHz frequency range for full-range sound reproduction
- FOR 70V AUDIO SYSTEM: Pyle horn pa speaker horn indoor/outdoor megaphone is great for your 70 V audio system. Perfect for outdoor PA systems when you need your voice heard far and wide. Includes a 70 Volt transformer tappable at 20, 10, & 5 watts
- EASY INSTALLATION: The mountable public address power horn speaker outdoor pa speaker comes with mounting bracket and hardware to make installation easier. The power horn only weighs 5.97 lbs and measures 9.7" H x 9.7" W x 11.3" D in total
- ALUMINUM HOUSING: This compact horn loud speaker music horn speaker sports an aluminum housing structure. The heavy-duty housing and structure provides a strong foundation and it is super easy to mount and install to your existing sound system
Amplifier 70 V ─────┬──── Speaker 1 70 V tap
                    ├──── Speaker 2 70 V tap
                    └──── Speaker 3 70 V tap

Amplifier COM ──────┬──── Speaker 1 COM
                    ├──── Speaker 2 COM
                    └──── Speaker 3 COM
You can use a daisy-chain or star layout if the cable, splices, enclosures, and installation method are suitable. HARMAN recommends connecting transformer primaries in parallel. Series wiring creates undesirable load and failure behavior (HARMAN guide).
Step 8: Calculate the amplifier load
Add the selected wattage tap for every horn:
Total load = Speaker 1 tap + Speaker 2 tap + Speaker 3 tap + ...
For example, four horns on 7.5 W taps produce a nominal 30 W load. The sum of all selected taps must not exceed the amplifier’s rated output. Choose practical headroom rather than operating an amplifier continuously at its limit; the appropriate margin depends on the amplifier, duty cycle, program material, and application.
HARMAN gives these useful relationships:
Minimum load impedance: Z = V² / P
Line current:            I = P / V
Here, Z is ohms, V is nominal line voltage, P is watts, and I is amperes. On a 70.7 V line, a 100 W amplifier corresponds to approximately 50 Ω:
Z ≈ 70.7² / 100 ≈ 50 Ω
A 50 W load draws approximately 0.71 A:
I ≈ 50 / 70.7 ≈ 0.71 A
There is no safe concept of an unlimited number of speakers on a 70 V line. The selected taps and amplifier capacity govern the load. A constant-voltage impedance/load meter is preferable when an existing system is undocumented. A normal ohmmeter measures DC resistance, not the transformer’s operating load impedance.
PC Slower Than It Used to Be?
A free scan shows the junk files, broken settings and background clutter dragging Windows down - then fixes them in one click.Free scan · Windows 10 & 11Crashes, No Sound, or Screen Glitches?
Random freezes, missing sound and display glitches usually trace back to one bad driver. Find and replace yours safely.Free scan · under a minuteStep 9: Choose the wattage tap
The tap affects both loudness and amplifier loading:
Best Value

- The wide frequency range ranges from 1,300Hz to 19,000Hz, and the high sensitivity of 108 db makes it a very loud and efficient driver.
- Handles an impressive 500 Watts Max power ( PAIR ) and 150w RMS ( PAIR ), ensuring that it effortlessly complements your entire audio system. Capacitor included. 8 Ohm Voice Coil. 75w RMS each horn Driver
- Complete your pro audio system with the TPT-DH175. With its 1″ voice coil, this driver maximizes loudness per watt, delivering crisp and clear high frequency range sound.
- Mounting Depth: 4.64”. Extremely loud and clear highs with an amazing frequency response that can even play some mids. Shallow mounting depth for custom car audio door panels.
- This compression driver is engineered for high SPL environments and is a perfect match for horn speakers for car audio, custom builds, and pro audio setups requiring clear, high-output sound
- Choose a lower tap if the horn is too loud or the system load is too high.
- Choose a higher tap if the horn is too quiet and amplifier capacity allows it.
- Never exceed the speaker’s rated power.
- Do not automatically choose the highest tap.
- Use the tap table for the selected line voltage.
HARMAN describes halving the power tap as an approximately 3 dB reduction in sound pressure level, although the result depends on the speaker and installation. Higher taps increase power draw as well as output.
Independent reader supportYour contribution helps us test, update, and keep practical guides available for everyone.Step 10: Check polarity, cable, and mounting
Maintain the same polarity throughout the system: amplifier positive or line terminal to the speaker’s positive-designated terminal, and COM or negative return to COM. Reversed polarity usually does not silence one horn, but inconsistent polarity between overlapping horns can cause cancellation, reduced bass, and uneven coverage.
Use cable appropriate for the building and environment. Outdoor or wet locations may require outdoor-rated cable, conduit, weatherproof junction boxes, and protected splices. Local electrical, fire, and building codes control the details. Keep speaker wiring away from AC wiring where practical, provide strain relief, and never leave bare conductors exposed.
Free tools Windows power users keep installed
One-click scans. No signup required.
Mount the horn securely. Outdoor horns can experience wind loading and vibration. Aim the horn at the listening area rather than directly at a nearby wall or other reflective surface. Weather resistance, temperature range, terminal protection, and mounting limits apply only to the specific model and installation method; do not generalize the specifications of one product to every horn.
Step 11: Test before full operation
- Confirm the speaker model, line voltage, tap, and amplifier output match.
- Check that every horn is connected between the line terminal and
COM. - Inspect splices, terminal covers, weather seals, and strain relief.
- Verify the total selected wattage against the amplifier rating.
- Check continuity and look for a short to ground or between conductors.
- Measure the installed load with a suitable constant-voltage meter if available.
- Reconnect and power the amplifier at low level.
- Test speech, alarm tones, and coverage one zone at a time.
- Stop if the amplifier clips, overheats, shuts down, or the horn produces severe distortion.
Troubleshooting
| Symptom | Likely causes | What to check |
|---|---|---|
| No sound | Wrong output, wrong voltage tap, open COM, failed driver, disconnected transformer, muted zone, or open supervision component |
Power down; verify the model diagram and cable continuity. Test one known-good speaker on the correct output. |
| Low volume | Tap set too low, wrong voltage, poor splice, cable loss, poor aiming, underpowered amplifier, or weak source signal | Verify the voltage-specific tap, inspect connections, and aim the horn toward the listening area. |
| Distortion | Clipping, excessive low-frequency energy, incorrect tap, damaged driver, overloaded line, or loose connection | Reduce level, verify the load, and use any manufacturer-approved filtering or high-pass setting. Transformer saturation can reduce impedance and severely stress the amplifier (HARMAN). |
| Amplifier overheats or shuts down | Tap total too high, partial short, incorrectly wired transformer, excessive voltage, or a constant-voltage horn on a low-impedance output | Power down and isolate speaker branches. Recalculate taps and inspect for shorts before reconnecting. |
| Hum or buzz | Grounding issue, broken shield, poor connection, transformer interaction, or cable routed beside AC | Inspect grounds and splices, separate input and speaker wiring, and follow the amplifier manual. Bogen lists these checks in its hum troubleshooting guidance (Bogen HTA manual). |
| Uneven coverage or weak bass | Mixed polarity, different taps, inconsistent aiming, reflective surfaces, different horn patterns, or a failing speaker | Check polarity and tap settings, then compare each horn individually. |
Emergency and fire-alarm installations
A paging horn is not automatically a listed fire-alarm notification appliance. If the system is legally required or supervised, verify the complete design rather than adding components by trial and error.
Some products offer optional capacitors or other provisions for line supervision. AtlasIED, for example, lists an optional 5 MFD capacitor for supervision on the AP-15TU, while the base model is not equipped with that capacitor (AtlasIED AP-15TU). Do not add, remove, or substitute a capacitor, end-of-line component, or monitoring device unless the exact system documentation requires it.
Also verify the speaker’s applicable listing, amplifier compatibility, backup power, cable requirements, supervision method, environmental rating, and authority-having-jurisdiction requirements. The word “emergency” in a product name is not enough evidence of compliance.
Quick wins for a faster PC:
Scan for outdated or missing drivers - takes under a minuteDriver Scan →Repair Windows errors before they cause bigger problemsFix Now →Fix the driver behind crashes, sound loss and screen glitchesFind Drivers →Quick Recap
When to call an installer
- The horn or amplifier is unlabeled or the wiring history is unknown.
- The system is part of fire alarm, evacuation, emergency voice, or mass notification.
- The installation requires conduit, penetrations, elevated work, or weatherproofing.
- The amplifier load cannot be established confidently.
- The amplifier repeatedly clips, overheats, or shuts down.
- The system requires supervision, battery backup, priority paging, or inspection approval.
Printable pre-power checklist
- ☐ Speaker model and wiring diagram identified
- ☐ Speaker type confirmed: 4/8 Ω or 25/70/100 V
- ☐ Amplifier output matches the speaker type and voltage
- ☐ Correct voltage-specific wattage tap selected
- ☐ All constant-voltage horns wired in parallel
- ☐ Every return conductor connected to
COM - ☐ Total tap wattage is within amplifier capacity
- ☐ Polarity is consistent
- ☐ Cable, splices, terminals, mounting, and weather protection checked
- ☐ Shorts and unknown loads investigated with suitable equipment
- ☐ Emergency-system listing and supervision requirements verified
- ☐ Initial test completed at low volume
Product prices and availability are accurate as of the date/time indicated and are subject to change. Any price and availability information displayed on Amazon at the time of purchase will apply.


Leave a Reply